In this tutorial, we will show you how to use Neocortix Cloud Services Scalable Compute to run a distributed LoadTest interactive job using NeoLoad 7.10, 7.7 or 7.6.
First, please follow the steps in the tutorial Setting Up For Batch Jobs.
After completion of the initial setup, you will have a directory with examples,
~/ncsexamples
.
In the subdirectory 
~/ncsexamples/neoload
you will find the launchAgents.py command. By default, this script will use NeoLoad 7.10, but you can edit the line below to choose NeoLoad 7.6 or 7.7. Please choose the NeoLoad version which matches the version of your NeoLoad Controller.
neoloadVersion = '7.10' # '7.6', '7.7' and '7.10' are currently supported
This script will create a set of instances running on mobile devices, one instance for each load generator.
In the default example provided, we ask for 10 instances:
nWorkers = 10,
launchAgents.py
will also
set up SSH port forwarding (also called "tunneling"). The port forwarding is important so that the NeoLoad Controller will be able to communicate with the Load Generator Agents through firewalls.
It will be necessary to specify the IP address of the machine on which you are running
launchAgents.py
.
-
Windows Subsystem For Linux:
The default IP address of
localhostis given in this line:forwarderHost = 'localhost'. This is appropriate if you are running the NeoLoad Controller on a Windows machine and runninglaunchAgents.pyunder Windows Subsystem for Linux (WSL).
-
Standalone Linux Machine:
If you are running
launchAgents.pyon an external Linux machine, you will need to determine the External IP Address of that machine using theifconfigcommand, and specify it with the line:forwarderHost = 'ExternalIPAddressHere'. If there is a firewall between your launchAgents machine and your NeoLoad machine, you need set rules to enable a block of TCP ports starting at 7102, one port for each potential load generator. If you would like to use a different range of port numbers, you can changeportRangeStartinlaunchAgents.py.
-
Windows VirtualBox:
If you are running
launchAgents.pyon a VirtualBox virtual machine on the same Windows machine as the NeoLoad Controller, you will need to determine the Local IP Address of that virtual machine using theifconfigcommand, and specify it with the line:forwarderHost = 'LocalIPAddressHere'.
launchAgents.py
will command the
instances to install the NeoLoad Load Generator Agent of the selected version number, get the IP address and port number of each instance.
launchAgents.py
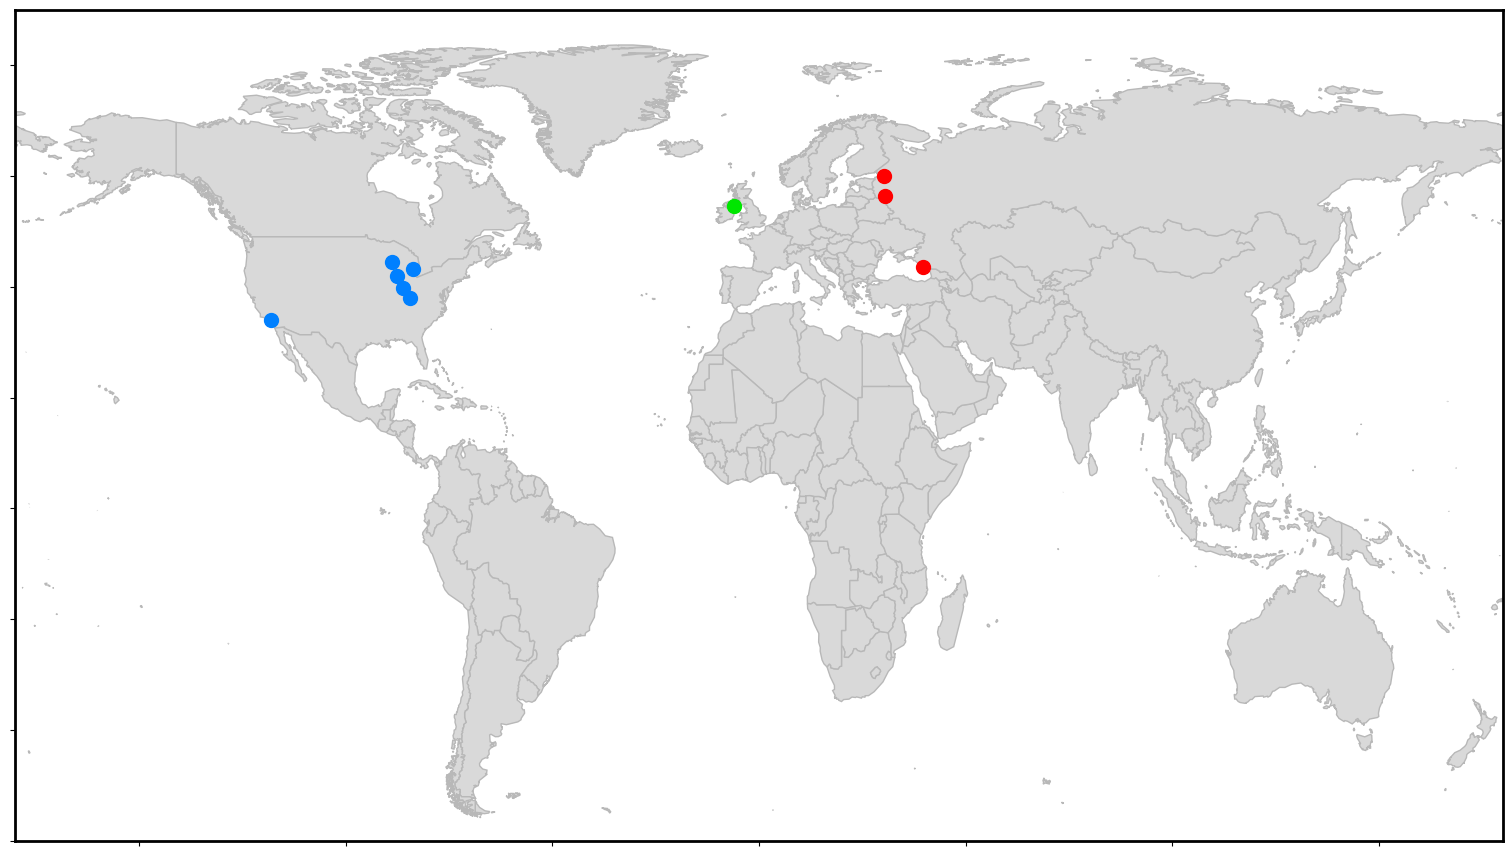
returns a world map showing the locations of the instances
./data/neoload_<time_stamp>/worldMap.png
.
Once launched, the Load Generator Agents wait for the NeoLoad Controller to contact them and tell them to start working.
Example Command
Simply run
The script will print a lot of progress messages. After several minutes, at the end, it will print lines like the following:
It will also save some logs and diagnostics to a
python3 ./launchAgents.py
forwarding: localhost:7102, localhost:7103, localhost:7104, localhost:7105, localhost:7106
when you want to terminate these instances, use python3 terminateAgents.py "data/neoload_<timestamp>/recruitLaunched.json"
data/neoload_<timeStamp>
directory, including an
agentForwarding.csv
file for reference, and a world map showing the locations of the instances
worldMap.png
.
Now run the NeoLoad controller application. In the Runtime Scenarios tab, there is a "Load Generators" list with a Plus Sign for adding generators.
Click the Plus Sign. Then copy the list of host:port pairs from the "forwarding" line of the launchAgents output, and paste it into the "Add Load Generators" edit box.

When you click OK, you should see your load generator addresses in the list, with little green dots next to them. Now click the checkbox next to each one, to enable it. If any of little dots are red, don't enable those. (If ALL of them are RED, it probably means there is a problem with the IP address of the launchAgents machine, or possibly that the firewall has not been configured properly.)
Make whatever other NeoLoad settings you like. We have found that it's good to allocate several simulated users for each load generator you have launched.
Click the "play" button to start a test. It may take up to 5 minutes for the test to initialize and get going. Occasionally, you may find that one or two of the agents does not work. This can happen due to real-world network circumstances.
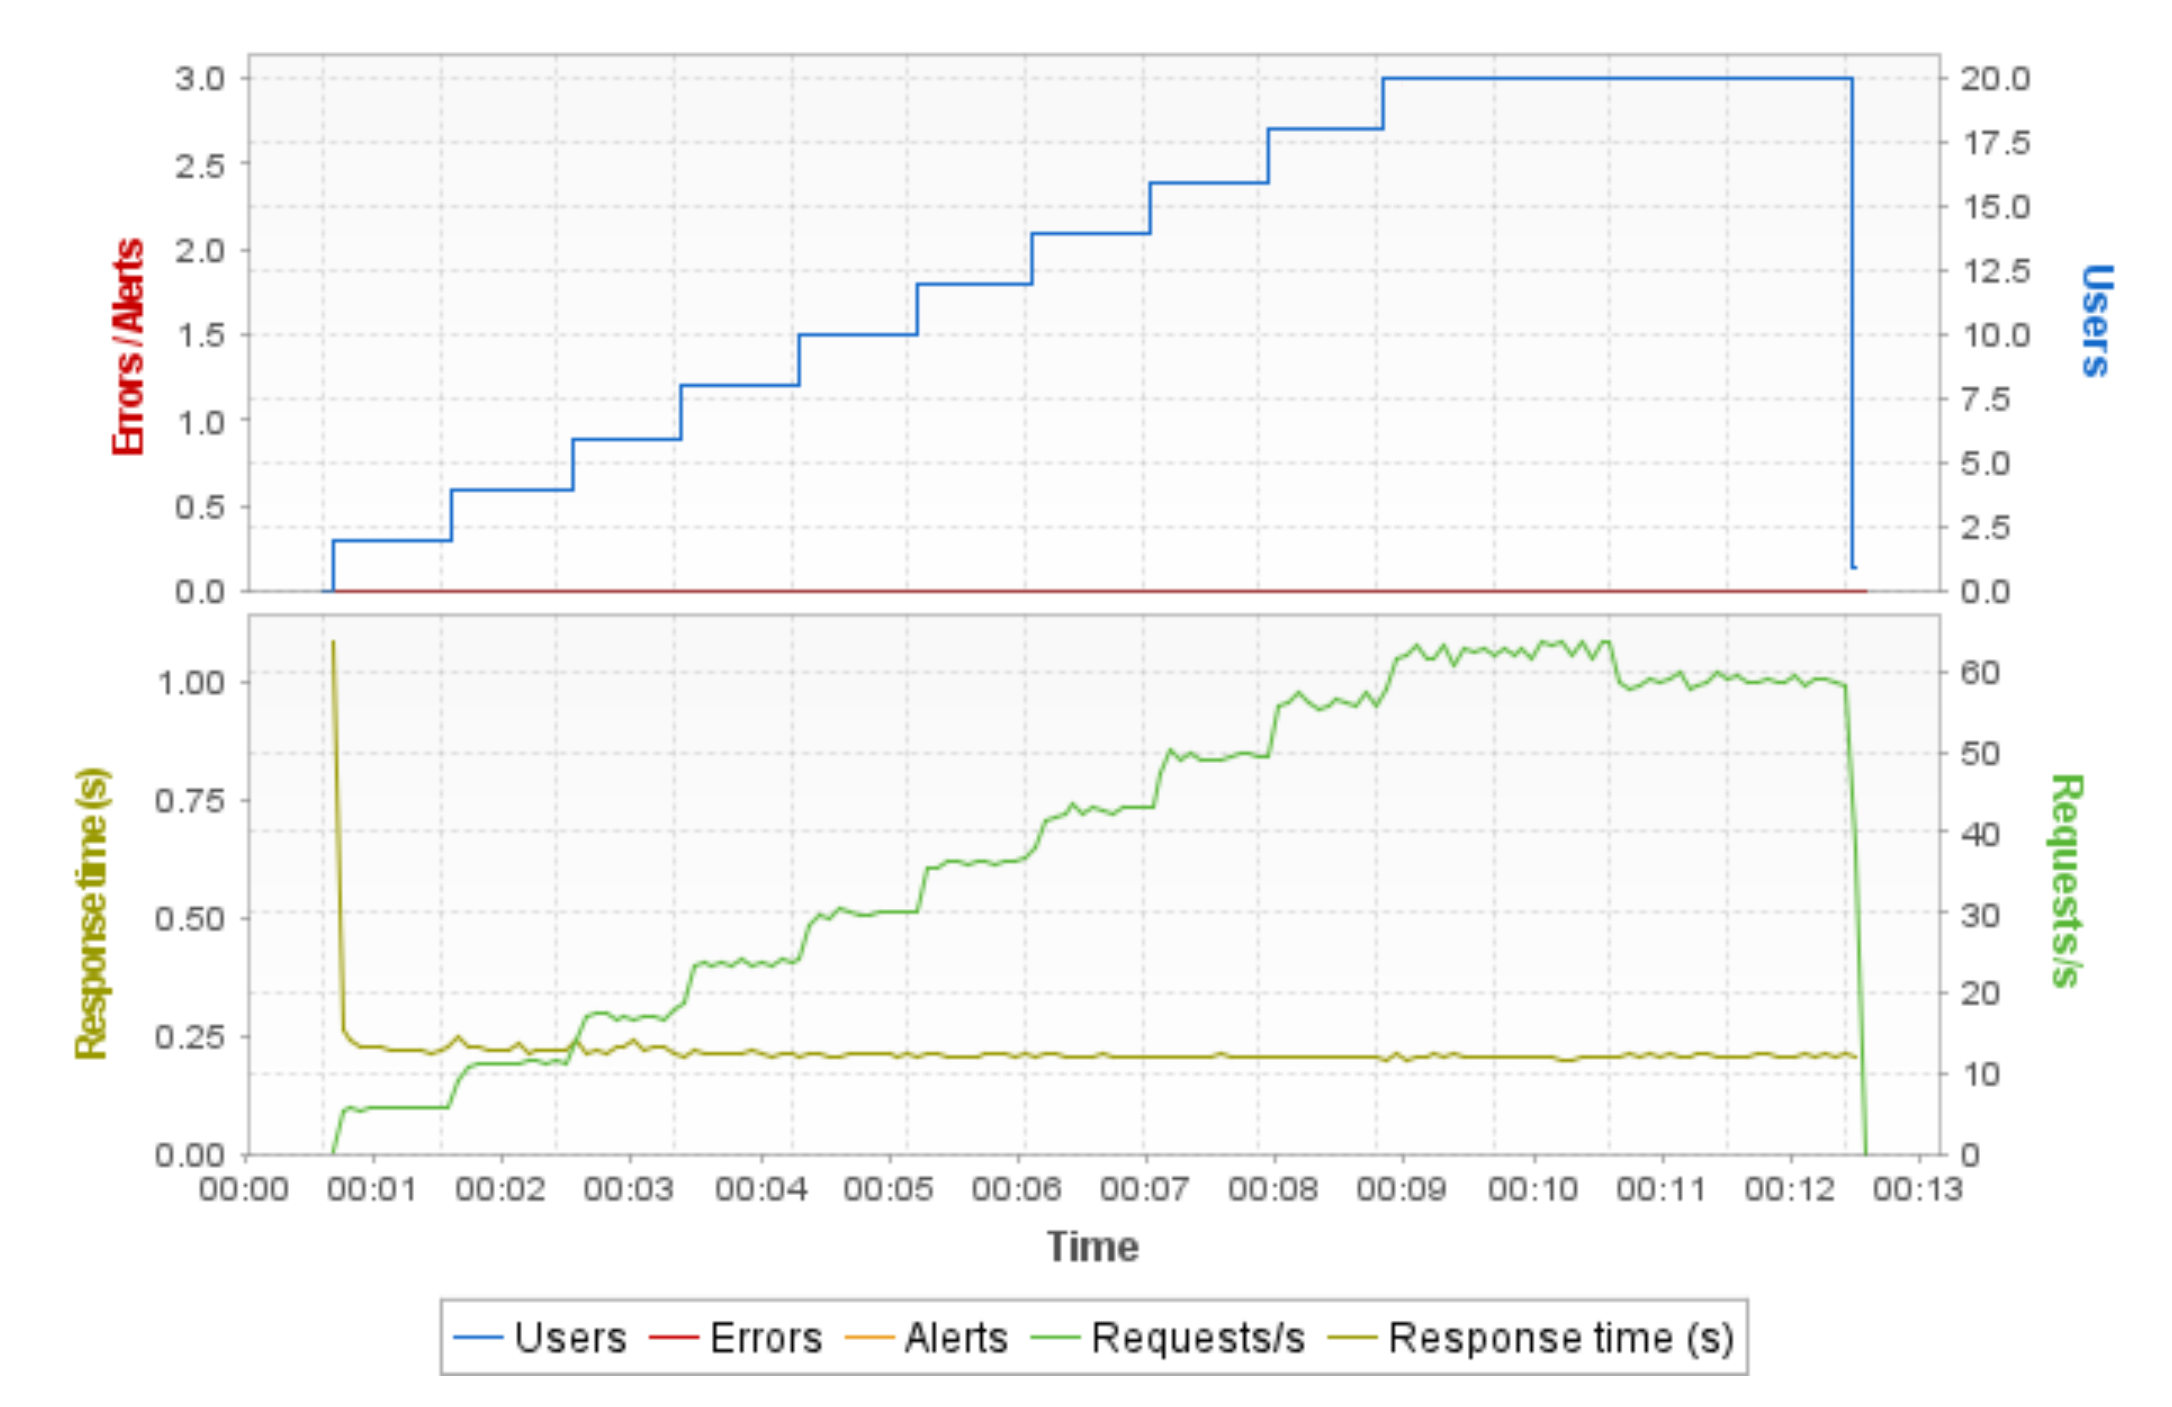
Here is an output graph and World Map for a 12-minute test (with 10 1-minute ramp steps) on 10 load generators.
When you are done testing, you may terminate the instances using the command printed out by
launchAgents.py
:
python3 terminateAgents.py "data/neoload_<timestamp>/recruitLaunched.json"
NeoLoad Web Example
NeoLoad Web has a more powerful interface which makes it much easier to tell the NeoLoad Controller where to find the Load Generators.
Instead of copy/pasting a list of IP addresses into the Controller, our instances are given an nlweb.properties properties file, with settings like these:
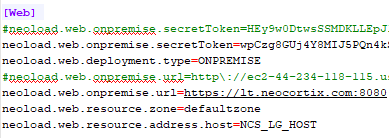
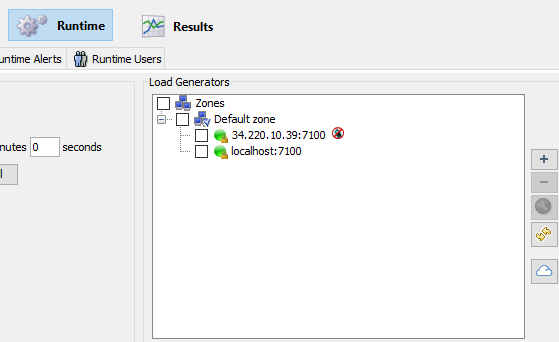
That makes them connect to the NeoLoad Web server and make themselves available for tests. The NeoLoad Web server shows them in its “resources” display, like this:
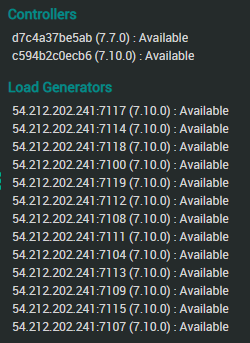
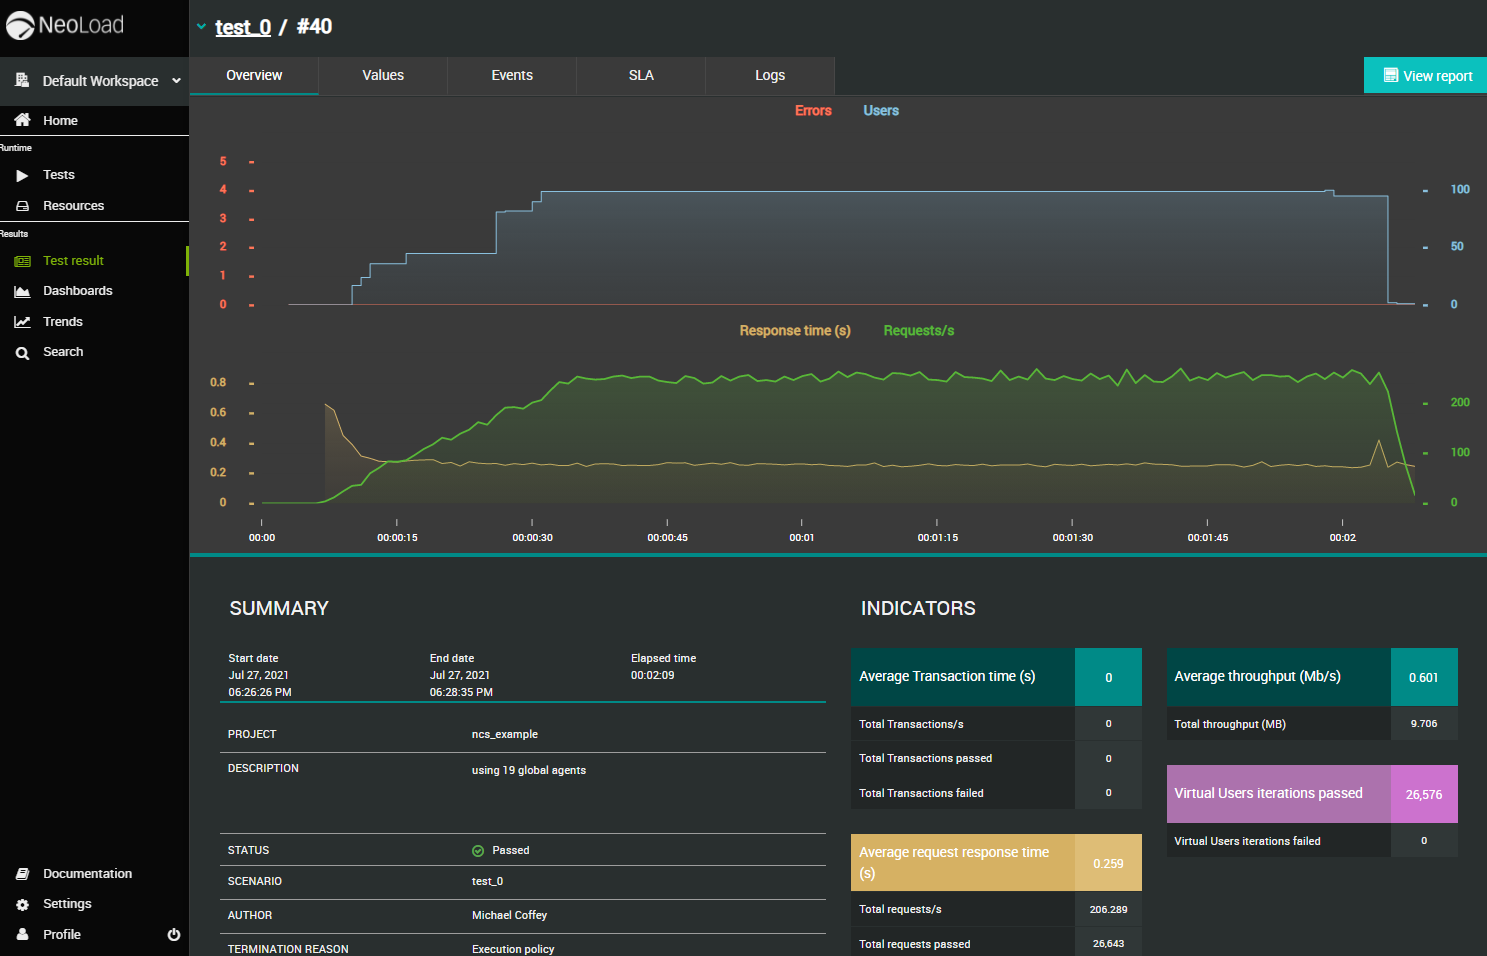
Here is a display of results in NeoLoad Web for 100 Virtual Users on 19 Neocortix Cloud Services instances, for a simple 2-minute test with 30-second ramp-up: