
In this tutorial, we will show you how to use Neocortix Cloud Services Scalable Compute to run a distributed LoadTest batch job, using a JMeter
client, in a framework where you can easily substitute your own LoadTest client.
At the end of the tutorial, we will show you how to stream data in real-time to an InfluxDB server.
First, please follow the steps in the tutorial Setting Up For Batch Jobs.
After completion of the initial setup, you will have a directory with examples,
~/ncsexamples
.
In the subdirectory 
~/ncsexamples/batchMode
you will find the runBatchJMeter.py command.
This script creates a set of instances running on mobile devices, one instance for each load generator.
In the default example provided, we ask for 6 successful instances:
startFrame = 1,
endFrame = 6,
nWorkers = 10,
By setting
nWorkers = 10
, we slightly over-allocate instances to allow for some fraction to fail.
It will command the instances to install JMeter, and then run JMeter with a short (90 seconds) and simple
TestPlan.jmx
to send http
requests to the target URL (currently https://loadtest-target.neocortix.com
):
def frameCmd( self, frameNum ):
cmd = 'date && apache-jmeter-5.3/bin/jmeter -n -t %s -l TestPlan_results_%03d.csv -D httpclient4.time_to_live=1 -D httpclient.reset_state_on_thread_group_iteration=true' % (
self.JMeterFilePath, frameNum
)
return cmd
The output of each instance will be
a .csv file
TestPlan_result_<n>.csv
containing request response timing information for each worker. The master will create several
image files WorldMap.png
, DeliveredLoad.png
, ResponseTimesByRegion.png
,
and then terminate the instances.
Example Command
Simply run
When the program is done, the output files
./runBatchJMeterAll.sh
TestPlan_results_<n>.csv
, WorldMap.png
,
DeliveredLoad.png
, ResponseTimesByRegion.png
,
graphs2.png
,
graphs3.png
,
histogram2.png
,
SLOcomparison.png
,
TestResults.html
,
trackedStderr.log
,
will be put in a directory
./data/jmeter_<datestamp>
Running a Longer Ramped Load Test
We also include Here are example outputs:
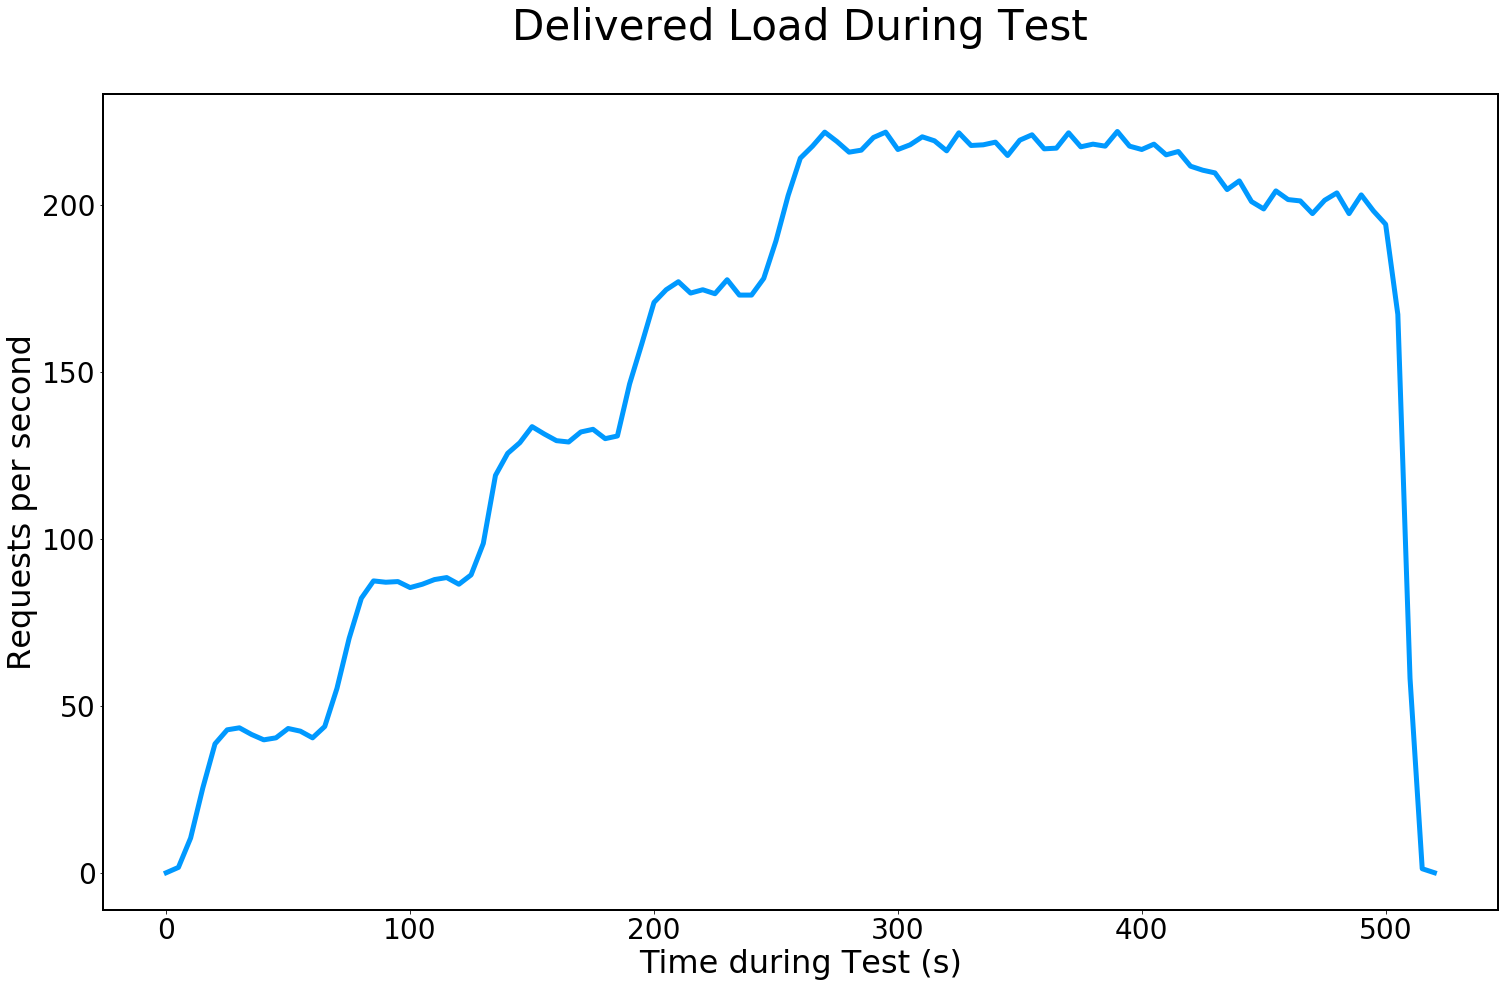
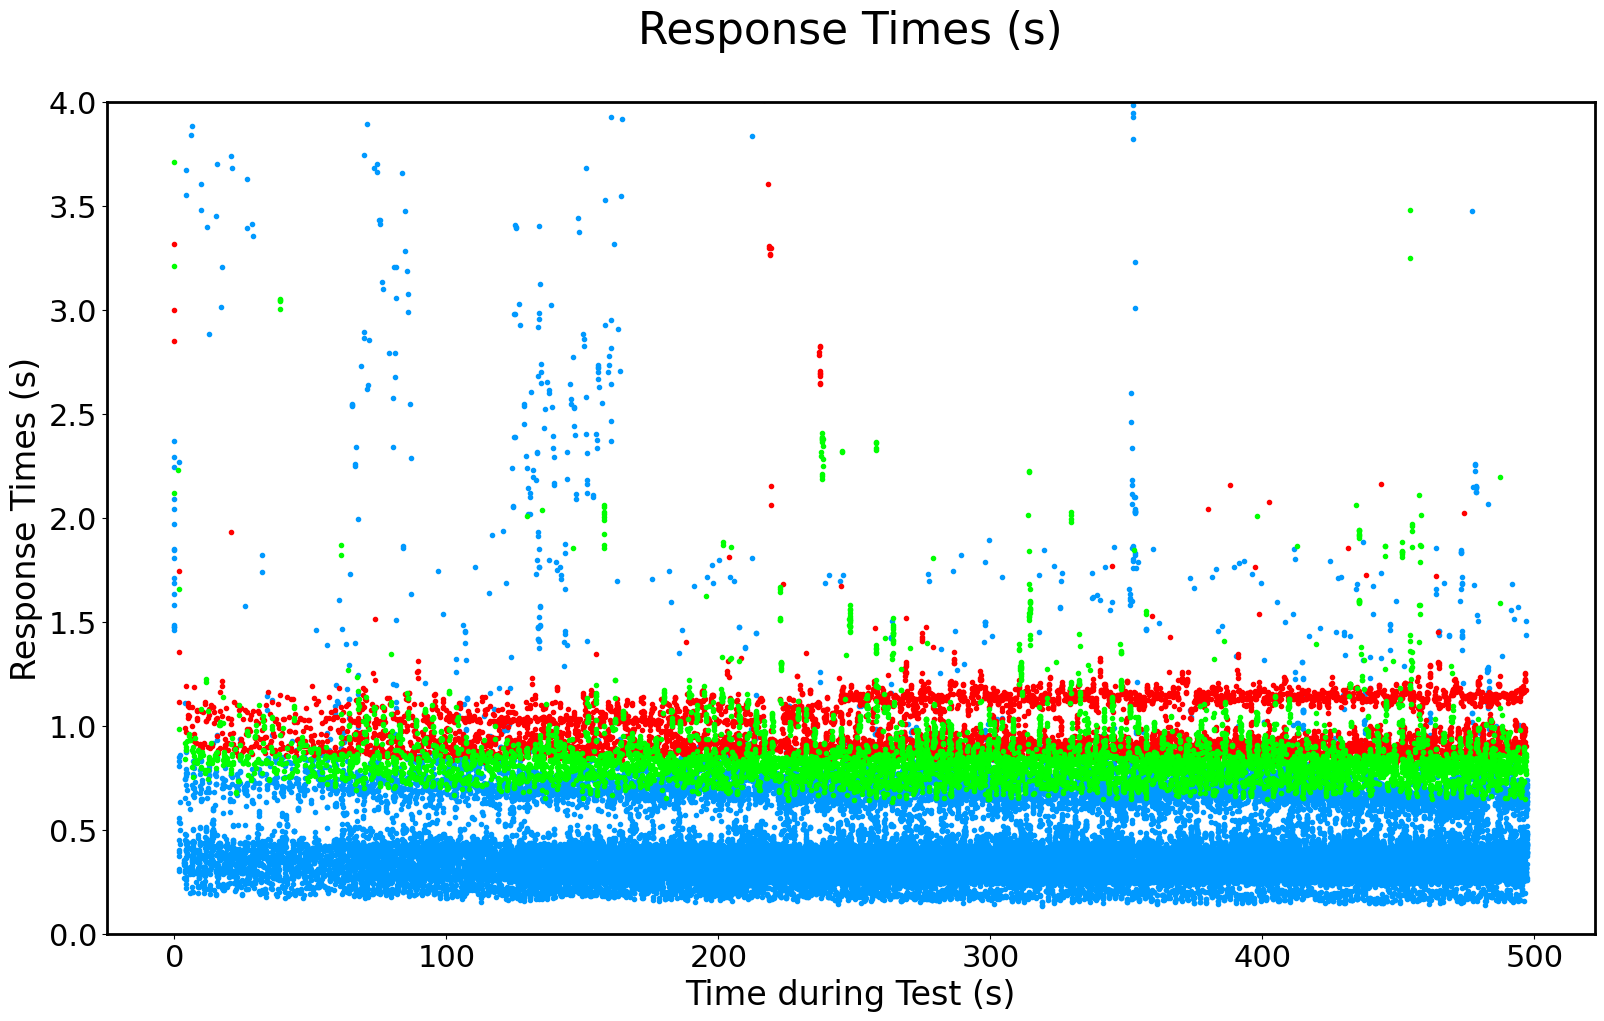

TestPlan_RampLong.jmx
, which does a 500 second Load Test with 30 devices with a 5-step ramp at 60 seconds
for each step. Just edit runBatchJMeter.py
and substitute TestPlan_RampLong.jmx
for
TestPlan.jmx
, and set endFrame = 30, nWorkers = 54
, and re-run
./runBatchJMeterAll.sh
Sending Data to an InfluxDB Server
If you have a running InfluxDB server, or access to a hosted InfluxDB service, you can configure your JMeter workers to send data to it in real time.
First, you must have InfluxDB server setup and accessible from the internet. You need to have a user with permissions to create and write to a database.
You need to add a “Backend Listener” with implementation
to your test plan.
org.apache.jmeter.visualizers.backend.influxdb.InfluxdbBackendListenerClient
to your test plan.
In JMeter GUI, you would add a Backend Listener to the root of your test plan. Alternatively, you can use a text editor to insert settings into your jmx file, but you have to be careful where you put it. Either way, the lines that get added to your jmx file look something like the following example.
You need to set the influxdbUrl to specify your InfluxDB host, database, user name, and password. You may also have a custom port number. The “application” field is also important if you want to be able to distinguish which data comes from which instances.
<BackendListener guiclass="BackendListenerGui" testclass="BackendListener" testname="Backend Listener" enabled="true">
<elementProp name="arguments" elementType="Arguments" guiclass="ArgumentsPanel" testclass="Arguments" enabled="true">
<collectionProp name="Arguments.arguments">
<elementProp name="influxdbMetricsSender" elementType="Argument">
<stringProp name="Argument.name">influxdbMetricsSender</stringProp>
<stringProp name="Argument.value">org.apache.jmeter.visualizers.backend.influxdb.HttpMetricsSender</stringProp>
<stringProp name="Argument.metadata">=</stringProp>
</elementProp>
<elementProp name="influxdbUrl" elementType="Argument">
<stringProp name="Argument.name">influxdbUrl</stringProp>
<stringProp name="Argument.value">http://yourDbHost.com:8086/write?db=yourDB&u=yourUserId&p=yourPassword</stringProp>
<stringProp name="Argument.metadata">=</stringProp>
</elementProp>
<elementProp name="application" elementType="Argument">
<stringProp name="Argument.name">application</stringProp>
<stringProp name="Argument.value">jmeter_x</stringProp>
<stringProp name="Argument.metadata">=</stringProp>
</elementProp>
<elementProp name="measurement" elementType="Argument">
<stringProp name="Argument.name">measurement</stringProp>
<stringProp name="Argument.value">jmeter</stringProp>
<stringProp name="Argument.metadata">=</stringProp>
</elementProp>
<elementProp name="summaryOnly" elementType="Argument">
<stringProp name="Argument.name">summaryOnly</stringProp>
<stringProp name="Argument.value">false</stringProp>
<stringProp name="Argument.metadata">=</stringProp>
</elementProp>
<elementProp name="samplersRegex" elementType="Argument">
<stringProp name="Argument.name">samplersRegex</stringProp>
<stringProp name="Argument.value">.*</stringProp>
<stringProp name="Argument.metadata">=</stringProp>
</elementProp>
<elementProp name="percentiles" elementType="Argument">
<stringProp name="Argument.name">percentiles</stringProp>
<stringProp name="Argument.value">50;90;95;99</stringProp>
<stringProp name="Argument.metadata">=</stringProp>
</elementProp>
<elementProp name="testTitle" elementType="Argument">
<stringProp name="Argument.name">testTitle</stringProp>
<stringProp name="Argument.value">test_0</stringProp>
<stringProp name="Argument.metadata">=</stringProp>
</elementProp>
<elementProp name="eventTags" elementType="Argument">
<stringProp name="Argument.name">eventTags</stringProp>
<stringProp name="Argument.value"></stringProp>
<stringProp name="Argument.metadata">=</stringProp>
</elementProp>
</collectionProp>
</elementProp>
<stringProp name="TestPlan.comments">convey to influxDb</stringProp>
<stringProp name="classname">org.apache.jmeter.visualizers.backend.influxdb.InfluxdbBackendListenerClient</stringProp>
</BackendListener>
<hashTree/>
Next, you need to create the destination database using the influx client or an InfluxDB API.
Next, you need to grant “write” privileges for the target database for that user, unless your user is an “admin” user. (“Admin” users can write to any database.)
You don’t need to do anything special in runBatchJMeter.py, other than to make sure you are using the jmx file that you just modified.
Optionally, you can make a change to runBatchPython.py, that would enable you to distinguish which data came from which worker instance. The trick here is that we set the “application” field differently for each worker. The only change is that we have inserted a sed command before the normal JMeter-launching command which runs on each instance. After running with this code, you will see values like ‘jmeter_001’ and ‘jmeter_002’ in the application column of your database. This code relies on the ‘application’ parameter of the backendListener in the jmx being set to ‘jmeter_x’, as shown above.
def frameCmd( self, frameNum ):
sedCmd = "sed -i 's/>jmeter_x</>jmeter_%03d</' %s" % (frameNum, self.JMeterFilePath)
cmd = sedCmd + ' && apache-jmeter-5.3/bin/jmeter -n -t %s -l TestPlan_results_%03d.csv -D httpclient4.time_to_live=20000 -D httpclient.reset_state_on_thread_group_iteration=true' % (
self.JMeterFilePath, frameNum
)
return cmd
When you run runBatchJMeter.py, it will stream loadtest results to your influxDB in real time as the test proceeds. The data will be in the same format as it would be from any other JMeter installation.