
In this tutorial, we will show you how run Advanced JMeter scripts with plug-ins, included files, JTL file aggregation, geographic selectivity, and advanced plotting and HTML reporting, using the classic JPetStore example.
This is an advanced tutorial. We assume that you have already successfully installed our
ncscli
software on your Linux machine and completed the
Basic JMeter tutorial.
Prepare The Master for JMeter HTML Reporting
To prepare the Master for JMeter HTML Reporting, please execute this command in the 
~/ncsexamples/batchMode
directory:
./installJMeter5.4.1.sh
The JPetStore Example
In the subdirectory And we ask for the devices to be located in USA or India, and we ask for them to be Gold-Rated Devices, with Device Performance Rating (DPR) of at least 48, at least 2.8GB of RAM, and the most up-to-date Neocortix software installed on them:
We also set the following time limits for the JPetStore example:
The actual duration of the JPetStore example is 10 minutes (600 seconds), so we set
~/ncsexamples/batchMode
you will find the runBatchJPetStore.py command.
This script creates a set of instances running on mobile devices, one instance for each load generator.
In the default example provided, we want 6 successful instances
endFrame = 6
,
so we set
nWorkers = 10
to allow some launched instances to fail.
startFrame = 1,
endFrame = 6,
nWorkers = 10,
filter = '{ "regions": ["usa", "india"], "dpr": ">=48", "ram:": ">=2800000000", "app-version": ">=2.1.11" }',
timeLimit = 60*60,
instTimeLimit = 12*60,
frameTimeLimit = 12*60,
frameTimeLimit = 12*60
(12 minutes, a little longer than the required 10 minutes of the test),
instTimeLimit = 12*60
(up to 12 minutes to install all needed software on the instances), and
timeLimit = 60*60
(up to one hour for the total duration of the test). Ordinarily, everything will be done faster than these time limits; these are just the time limits that will be used if something goes wrong and the run has to be terminated because it ran for too long. If you increase the duration of the test, say, from 10 minutes to 60 minutes, you should increase the time limits accordingly, like this:
timeLimit = 90*60,
instTimeLimit = 12*60,
frameTimeLimit = 66*60,
You will also find the subdirectory
~/ncsexamples/batchMode/jmeterWorker
, which contains all the files and additional subdirectories that are needed to run the advanced JMeter test. In particular, it contains the following files:- JPetstore_JMeter5.4.1.jmx: Classic JPetStore load test demo, with various task categories like 01_Launch, 02_Login, 03_Fish, 04_Dogs, 05_Cats.
- user.csv: A .csv data file containing user identifiers.
- jmeter-plugins-cmn-jmeter-0.6.jar: Required JMeter plugin file.
- jmeter-plugins-graphs-additional-2.0.jar: Required JMeter plugin file.
- jmeter-plugins-graphs-basic-2.0.jar: Required JMeter plugin file.
- jmeter-plugins-manager-1.6.jar: Required JMeter plugin file.
All of these files in the
jmeterWorker
directory will be sent to each instance, in its own jmeterWorker
directory.
Example Command
Simply run
When the program is done, all output files will be put in a directory
In that directory, the output data files from each instance will appear in
The generated images will appear in
The report and data files are:
./runBatchJPetStoreAll.sh
./data/petstore_<datestamp>
jmeterOut_<n>/TestPlan_results.csv
jmeterOut_<n>/VRT.jtl
01_WorldMap.png
02_HitsPerSecond.png
03_ResponseTimesByLabel.png
04_ResponseTimesByLabelMean.png
05_ResponseTimesByRegion.png
06_ResponseTimesByRegion2.png
07_ActiveThreads.png
08_Graphs2.png
09_Graphs3.png
10_Histogram2.png
11_SLOcomparison.png
TestResults.html (Neocortix HTMl report)
htmlReport (JMeter HTML report directory)
trackedStderr.log (log file from the run)
VRT_<datestamp>.jtl (merged data file .jtl)
Here are example outputs, in

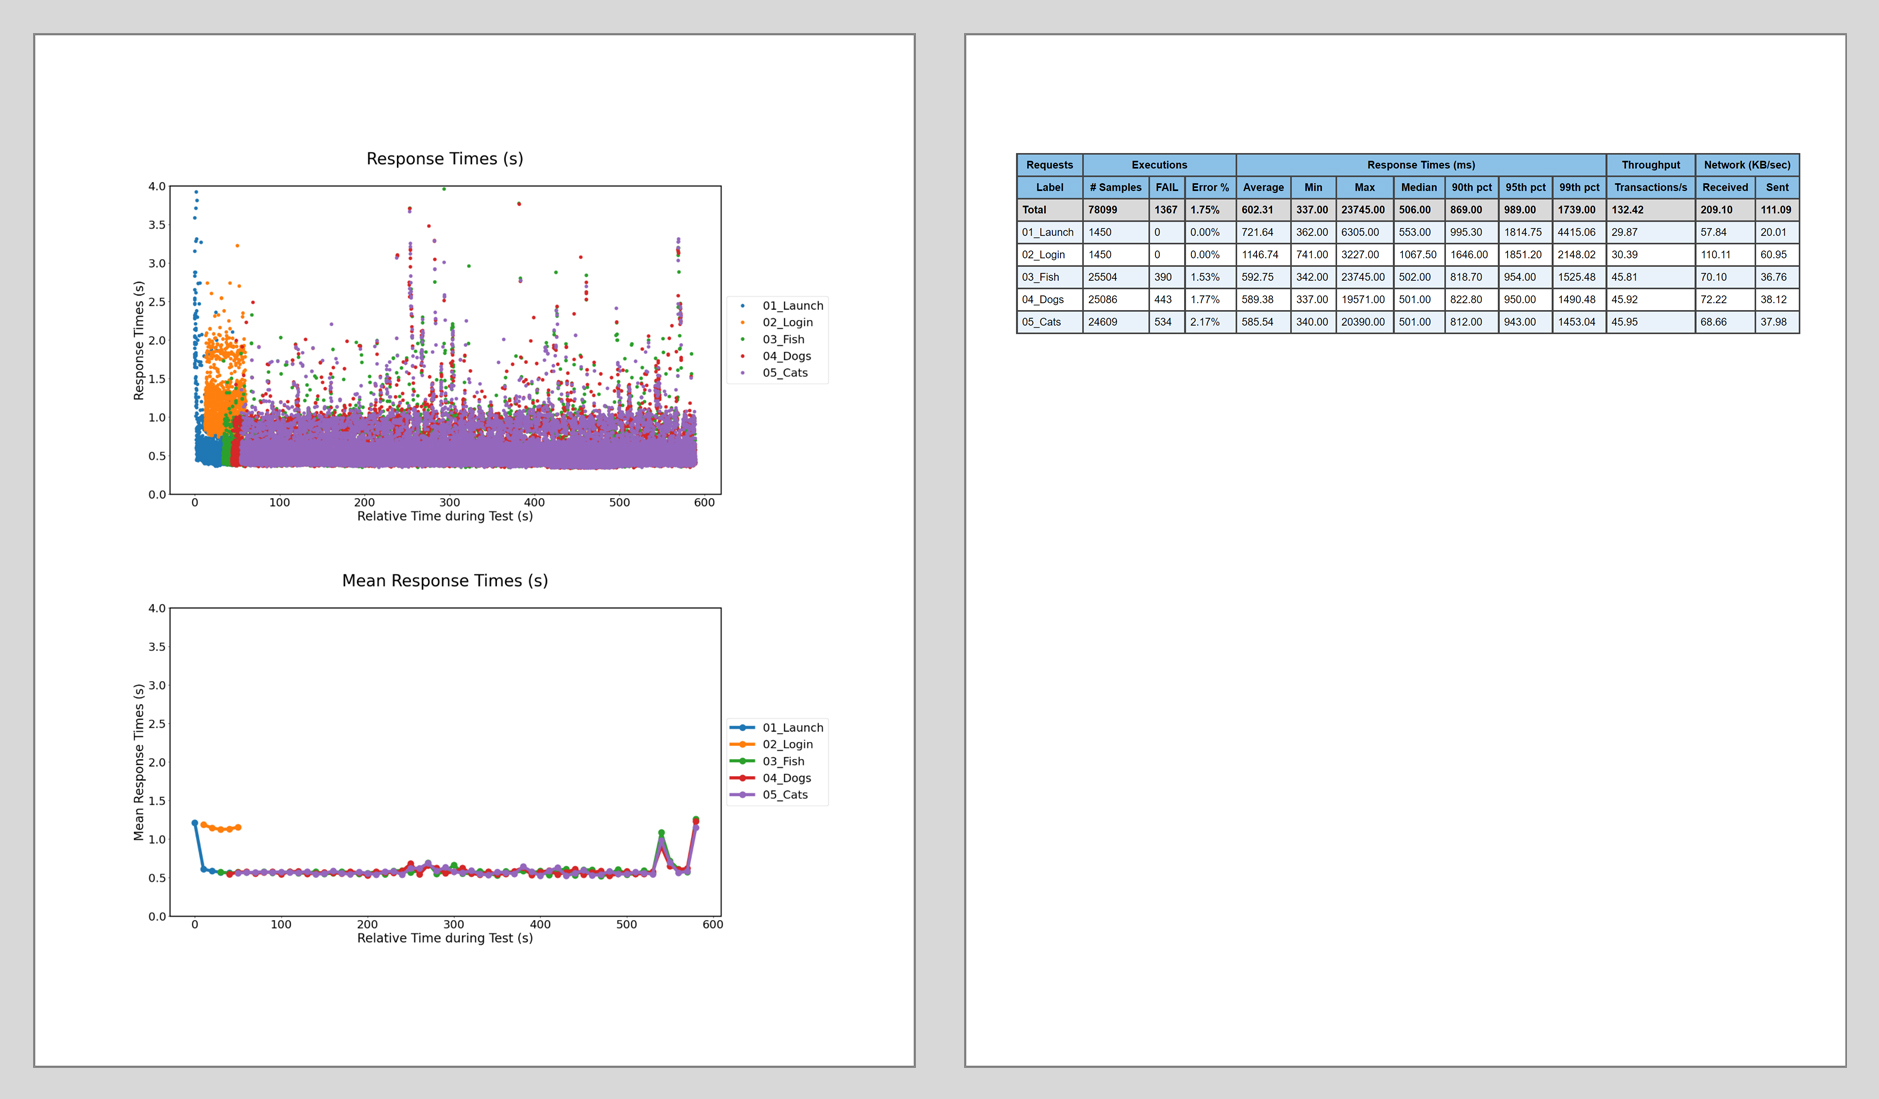
./data/petstore_<date>/TestResults.html
:
Running a Larger Example
Now that you have the JPetStore example working on a small number of instances, please edit Now please re-run
And you should get results similar to the above.
runBatchJPetStore.py
to
increase the number of instances to achieve the desired Load. For example, for 30 instances, try these parameters:
startFrame = 1,
endFrame = 30,
nWorkers = 54,
./runBatchJPetStoreAll.sh
The JImageUpload Example
In the subdirectory
~/ncsexamples/batchMode
you will find the runBatchJImageUpload.py command.
This example is built on top of the JPetStore example, with the additional element of uploading images to the server from a subdirectory of the
./jmeterWorker
directory.
To set up for this example, please execute the following commands from the Now your
~/ncsexamples/batchMode
directory:
mv jmeterWorker jmeterWorker_old
mv jmeterWorker_alt jmeterWorker
./jmeterWorker
directory contains all the files and subdirectories necessary to run the JImageUpload example. In particular, it will contain the file
./jmeterWorker/JImageUpload.jmx
, which is the .jmx file used to run the example. It will also contain the files
./jmeterWorker/TestData/TestData/ImageDetails.csv
, which has a list of paths to image files, with paths like
TestData/TestData/image1.png
, etc. And it contains the corresponding image files. The purpose of this example is to illustrate the correct form of these paths.
Running the JImageUpload Example
Simply run
When the program is done, all output files will be put in a directory
Here are example outputs, in
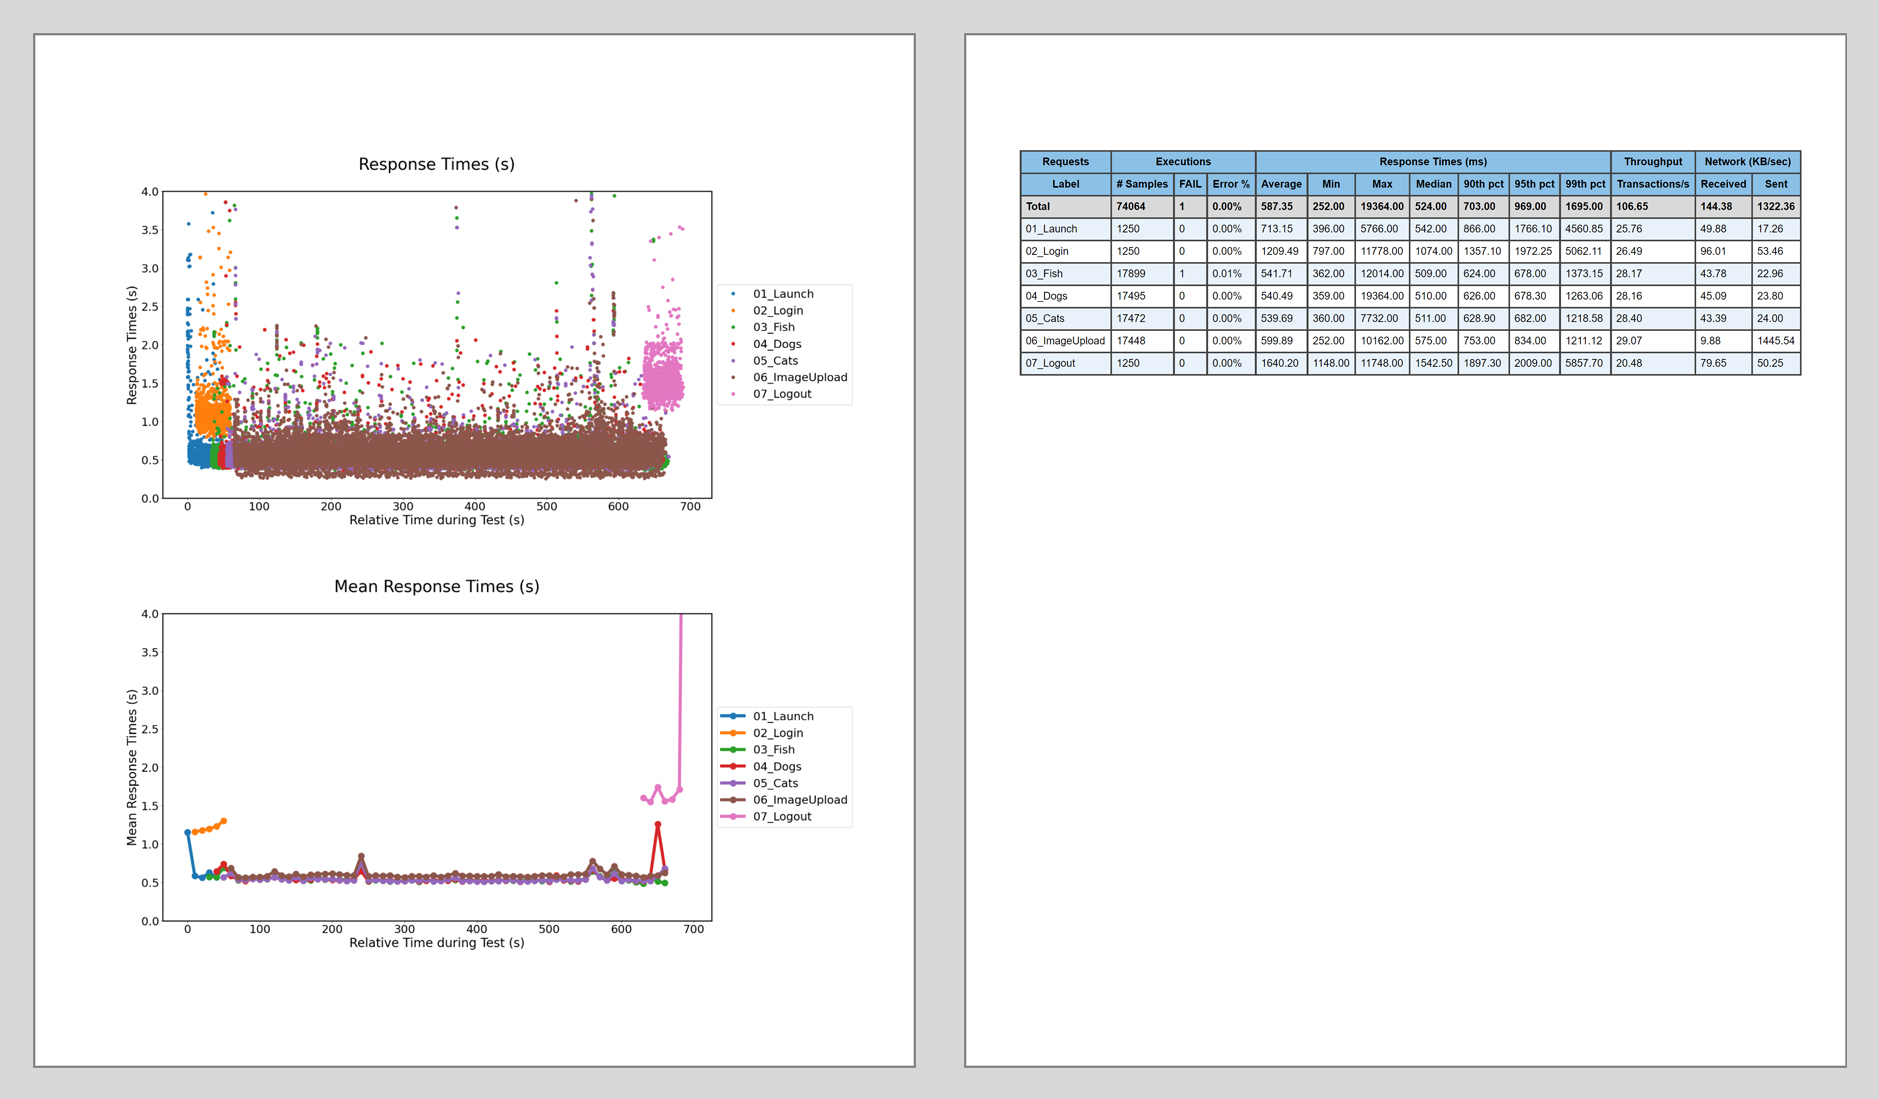
./runBatchJImageUploadAll.sh
./data/imageUpload_<datestamp>
./data/imageUpload_<date>/TestResults.html
, showing the results for the new
06_ImageUpload
task: